Low Cost Accurate Air Quality Sensor (PM/Temperature/Humidity)
You can find the code and drawing diagram at this repo.
Accurate and reliable air quality sensors that can measure PM1/2.5/10 is very expensive (over $200). With a low cost WiFi enabled microcontroller like the ESP32 used, you can build an air quality sensor for less than $120 (can go as low as $40 if you source differently, the trade off being quality and lead time).
This particular setup solderless by design. The air quality currently is already extremely terrible due to the wildfires and adding solder fumes to the small living space is a terrible idea.
This project as three main functionality to broadcast the sensor information.
Intranet website hosted on the ESP32 with an aesthetic dashboard
Publishes sensor information to an IoT Cloud Service (Thingspeak) to monitor and plot the sensor trend remotely
IFTTT (Webhook) integration to e-mail the user when the air quality is bad
Bill of Materials (BOM)
The total CoG (Cost of Goods) is about $110 depending on shipping and availability. I prefer to shop at Adafruit because they are reputable vendor and provide amazing documentation. They provide a good overview on the device itself and how to set it up. They also provide Arduino and various libraries (such as the Fritzing library I used to make the wiring drawing).
PM2.5 Air Quality Sensor and Breadboard Adapter Kit - PMS5003: Quantity 1 - [Link]
Adafruit BME680 - Temperature, Humidity, Pressure and Gas Sensor - STEMMA QT: Quantity 1 - [Link]
Half-size breadboard: Quantity 1 - [Link]
STEMMA QT / Qwiic JST SH 4-pin to Premium Male Headers Cable - 150mm Long: Quantity 1 - [Link]
Premium Male/Male Jumper Wires - 40 x 6” (150mm): Quantity 1 - [Link]
Assembled Adafruit HUZZAH32 – ESP32 Feather Board - with Stacking Headers: Quantity 1 - [Link]
Setting up ESP32 with Arduino
There are plenty of great resources online that shows you how to setup the Arduino IDE with your ESP32. I will not go into details but I have provided some resource below.
https://github.com/espressif/arduino-esp32/blob/master/README.md
https://randomnerdtutorials.com/installing-the-esp32-board-in-arduino-ide-windows-instructions/
I ran into the issue that I was unable to connect the ESP32 with my Linux computer running Ubuntu 18.04 even though the driver is built into the kernel. I speculate there is some sort of issue with the 5.X kernel since the manufacture website only has drivers for upto 4.X. I managed to make it work on my Mac with the following commands:
brew tap caskroom/drivers
brew cask install silicon-labs-vcp-driver
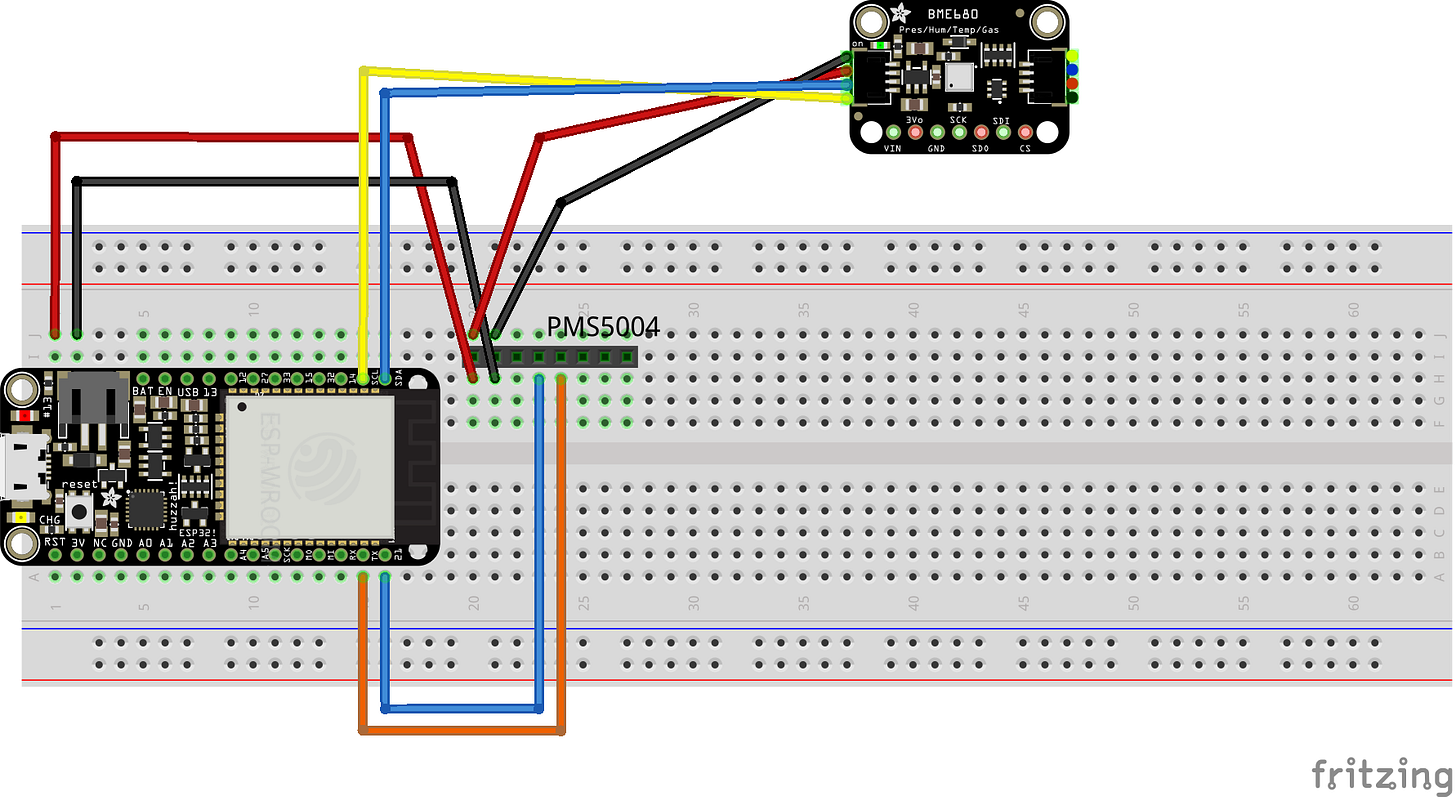
Wiring Diagram
There are labels on the PMS5003 breakout board that shows the pinout. The sensor connects via serial. Therefore as a reminder, the Tx and Rx is always relative to itself. Which means the Tx of the sensor connects to the Rx of the ESP32 and vice versa. The Vcc and Ground goes to the ESP32 VCC and Ground.
For the BME680, I decided to use I2C (it also supports SPI). I used a Qwiic cable instead of soldering the header pins and jumper wires. Connect the red cable to the Vcc and the black cable to Ground on the ESP32. The yellow wire connects to SCL and the blue goes to the SDA.
Library
For this project, these libraries are used:
Arduino-ESP32 to program the ESP32 in Arduino IDE and syntax
Dash for the webserver + awesome front end dashboard
Adafruit BME680 Library to connect to the BME680 easily
Thingspeak to connect to the Iot Platform Thingspeak to view the data remotely with interactive graphs
Here are the options to install the libraries
Copy the library folder on my Github
Clone my repo (git clone REPO_NAME) and copy my library folder into your Arduino library folder. Restart the IDE if it’s opened to load the new libraries
Installing them yourself
Follow the guide on the pages linked above to install the libraries. NOTE: There is a naming conflict between the libraries. It was easier to rename the Thingspeak library. Rename all the ERR_TIMEOUT to ERROR_TIMEOUT or the code won’t compile. The alternative is to remove the Thingspeak feature on the Arduino INO file.
Configuring the code
There are couple parameters in the code you will need to change to get it to work.
Change the Wifi SSID and Password to match you local Wifi
Change the IP address to match your network setting.
Add the Thingspeak Channel ID and API Write Key
Follow this tutorial to learn more
Setup the three fields as PM1, PM2.5, and PM10 (in this order)
Add the IFTTT keys
If you are uncertain how to do this, follow this tutorial
Compile and Run
Open the INO file in the Arduino IDE. Compile and upload to your ESP32. Use the serial monitor to make sure the sensor is reading correctly and updating. Here is an example of the website dashboard.
References/Credit
A lot of my code was a mix and match of other’s hard work. Please visit some of the resources I used to make this all happen:
https://forum.arduino.cc/index.php?topic=504377.0
https://github.com/pawitp/esp01-pmsx003
https://github.com/consolacion/IFTTT-Webhook/blob/master/IFTTTMaker.ino
https://medium.com/initial-state/how-to-build-your-own-esp32-temperature-monitor-6967b797b913
https://iotdesignpro.com/projects/how-trigger-led-using-ifttt-and-esp32-email-notification


